Introduction:
In the digital age, creating a website is essential for individuals, businesses, and organizations to establish an online presence and reach a global audience. Building a website may seem daunting, but with the right tools and techniques, it is relatively easy and straightforward. In this article, we will provide a step-by-step guide on how to create a website.

Step 1: Choose a Domain Name
The first step in creating a website is selecting a domain name. A domain name is the address that people type in their web browser to access your website. When choosing a domain name, consider a name that is memorable, easy to spell, and represents your brand or business. You can check domain availability on various domain registrar websites, such as GoDaddy, Namecheap, or Google Domains.
Step 2: Choose a Web Hosting Provider
After selecting a domain name, the next step is to choose a web hosting provider. A web hosting provider is a service that stores your website files and makes them accessible to the internet. When choosing a web hosting provider, consider factors such as uptime, customer support, security, and pricing. Popular web hosting providers include Bluehost, HostGator, and SiteGround.
Step 3: Choose a Website Platform
Once you have selected a domain name and web hosting provider, the next step is to choose a website platform. A website platform is a software that allows you to create and manage your website. There are several website platforms available, including WordPress, Wix, Squarespace, and Shopify. WordPress is the most popular website platform, powering over 40% of websites on the internet.
Step 4: Install WordPress
If you have chosen WordPress as your website platform, the next step is to install WordPress on your web hosting provider. Most web hosting providers offer a one-click WordPress installation option, making it easy and quick to set up. Alternatively, you can download WordPress from the official website and install it manually.
Step 5: Choose a Theme
After installing WordPress, the next step is to choose a theme for your website. A theme is a pre-designed template that determines the layout, color scheme, and overall appearance of your website. WordPress offers a vast collection of free and premium themes that you can install and customize to fit your brand or business.
Step 6: Install Plugins
Plugins are software components that add additional functionality to your website. WordPress offers thousands of plugins that you can install to enhance your website's features and performance. Popular plugins include Yoast SEO, Jetpack, WooCommerce, and Contact Form 7.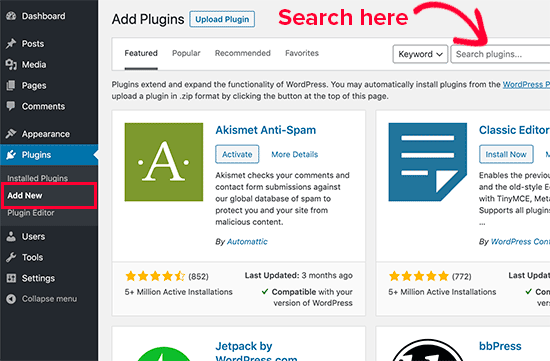
Step 7: Customize Your Website
After installing the theme and plugins, the next step is to customize your website. You can use the WordPress Customizer to modify the theme settings, such as fonts, colors, and header images. You can also create pages, posts, and menus to organize your content and improve the user experience.
Step 8: Add Content
Once you have customized your website, the next step is to add content. Content is the information that your website provides to the users, such as text, images, videos, and audio. You can use the WordPress editor to create and publish posts and pages, or you can import content from other platforms, such as Blogger or Tumblr.
Step 9: Optimize Your Website for Search Engines
Search engine optimization (SEO) is the process of optimizing your website to rank higher in search engine results pages (SERPs). SEO can help increase your website's visibility, traffic, and conversions. You can use various SEO techniques, such as keyword research, meta tags, internal linking, and backlinking, to improve your website's SEO.
Step 10: Test and Launch Your Website
After adding content and optimizing your website, the final step is to test and
User
launch your website. Testing is essential to ensure that your website works correctly and looks good on different devices and web browsers. You can use various testing tools, such as Google PageSpeed Insights, GTmetrix, and BrowserStack, to check your website's performance and compatibility.
Once you have tested your website and fixed any issues, it's time to launch it. To launch your website, you need to point your domain name to your web hosting provider's server and make your website live. After launching your website, make sure to monitor its performance and make any necessary updates and improvements regularly.
Conclusion:
Creating a website may seem like a daunting task, but with the right tools and techniques, anyone can create a website. In this article, we have provided a step-by-step guide on how to create a website, from choosing a domain name to launching your website. By following these steps, you can create a website that represents your brand or business, attracts visitors, and achieves your goals.